

This post describes one way to use certain Inuktut syllabics fonts when writing documents in LaTeX, along with some other LaTeX tips.
What you need to know to understand this post
- Knowledge of LaTeX (for typesetting documents).
- Knowledge of a typesetting system for LaTeX, like TeX, or an editor like Overleaf.
What is needed to replicate the main content in the post?
- Have downloaded the font you want to use (we’ll discuss this next).
- Have access to a LaTeX typesetting system or an editor like Overleaf that allows you to compile using XeLaTeX (rather than pdfLaTeX).
Typesetting Syllabics (and More) in LaTeX
In an earlier blog post, you saw how to display various fonts in web browsers. Here, we’ll talk about how to use fonts like Pigiarniq in documents that are being typeset in LaTeX (e.g., many academic journals and conference papers).
Specifically, you’ll see one way to typeset text written in ᖃᓂᐅᔮᖅᐸᐃᑦ (qaniujaaqpait; Inuktut Syllabics) using LaTeX, XeLaTeX, and the Pigiarniq font family. Our example focuses on a scenario where you’re writing in a mix of fonts and orthographies, but it can be modified for text written entirely in syllabics.
You’ll also see some variations of these techniques that work for other characters and fonts.
Read through for more details, or skip ahead to the Review/Quick Start section if you prefer.
Setup
We’ll demonstrate this using Pigiarniq, a font which can be downloaded from the Tiro Typeworks website.
If you want to follow along, first download the Pigiarniq zip file and extract the font files. For this demonstration, we’ll start with Pigiarniq Regular.ttf. If you are using a different font, you may want to read the detailed instructions for using new fonts in Overleaf’s instructions on using custom fonts. It explains different approaches to using new fonts, and explains why some fonts can be compiled out of the box with pdfLaTeX and others can’t. If you’re not sure whether your font can be easily compiled or not, give it a read!
Next, you’ll want to open your LaTeX editor of choice. If you’re using Overleaf (where we tested this approach), you can directly upload the Pigiarniq Regular.ttf file into your project. Other LaTeX editors may need you to specify a path to where Pigiarniq Regular.ttf is stored on your computer, or you may also be able to simply put it in the folder with your LaTeX files.
In the next section, you’ll see code for a minimal working example. We’ll walk through it step-by-step below. If you want to start right away, copy that code into a new file (named something like main.tex) and compile it using XeLaTeX to see the output pictured below. In Overleaf, you can compile with XeLaTeX by going to Menu > Settings > Compiler and selecting XeLaTeX from the dropdown.
Minimal Working Example
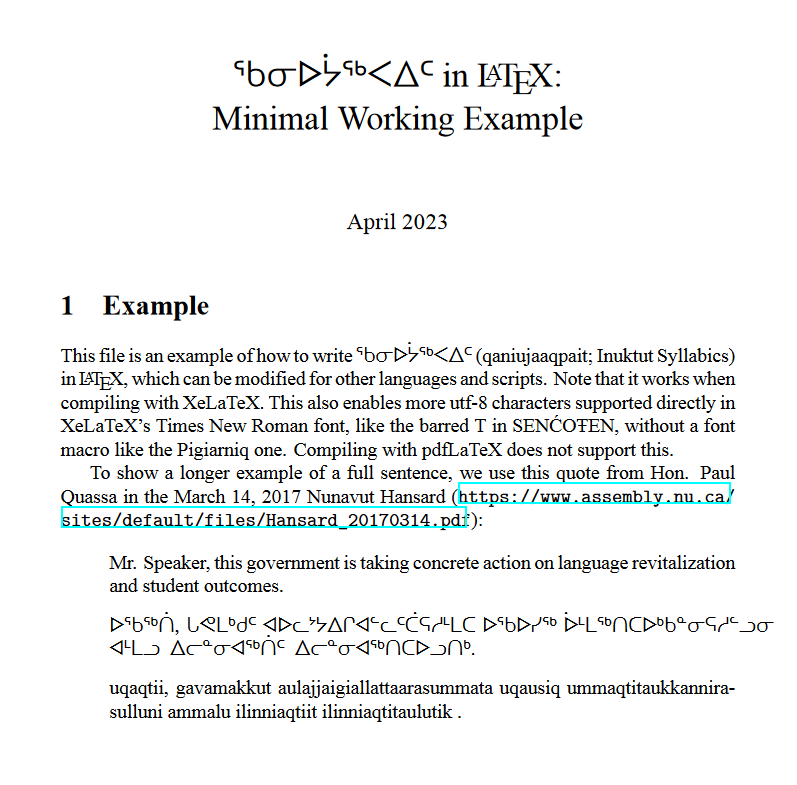
This minimal working example of LaTeX produces the PDF shown below, when compiled using XeLaTeX.
\documentclass{article}

\usepackage{hyperref} % Just used for formatting the URL citation.

\usepackage{fontspec}
\newfontfamily{\pigiarniq}{Pigiarniq}[Extension = .ttf, UprightFont = Pigiarniq Regular]
% The font file `Pigiarniq Regular.ttf` should be located somewhere that the compiler can find it.

\setmainfont{Times New Roman}

\title{{\pigiarniq ᖃᓂᐅᔮᖅᐸᐃᑦ} in \LaTeX:\\ Minimal Working Example}
\author{}
\date{April 2023}

\begin{document}

\maketitle

\section{Example}
This file is an example of how to write {\pigiarniq  ᖃᓂᐅᔮᖅᐸᐃᑦ} (qaniujaaqpait; Inuktut Syllabics) in \LaTeX, which can be modified for other languages and scripts. Note that it works when compiling with XeLaTeX. This also enables more utf-8 characters supported directly in XeLaTeX's Times New Roman font, like the barred T in SENĆOŦEN, without a font macro like the Pigiarniq one. Compiling with pdfLaTeX does not support this.

To show a longer example of a full sentence, we use this quote from Hon. Paul Quassa in the March 14, 2017 Nunavut Hansard (\url{https://www.assembly.nu.ca/sites/default/files/Hansard_20170314.pdf}):

\begin{itemize}
    \item[]  Mr. Speaker, this government is taking concrete action on language revitalization and student outcomes.
    \item[] {\pigiarniq ᐅᖃᖅᑏ, ᒐᕙᒪᒃᑯᑦ ᐊᐅᓚᔾᔭᐃᒋᐊᓪᓚᑦᑖᕋᓱᒻᒪᑕ ᐅᖃᐅᓯᖅ ᐆᒻᒪᖅᑎᑕᐅᒃᑲᓐᓂᕋᓱᓪᓗᓂ ᐊᒻᒪᓗ ᐃᓕᓐᓂᐊᖅᑏᑦ ᐃᓕᓐᓂᐊᖅᑎᑕᐅᓗᑎᒃ.}
    \item[] uqaqtii, gavamakkut aulajjaigiallattaarasummata uqausiq ummaqtitaukkannirasulluni ammalu ilinniaqtiit ilinniaqtitaulutik .
\end{itemize}

\end{document}
Output
This is what the compiled PDF looks like:
How This Code Works
The code above shows an article-style document in LaTeX, written mostly in English but also containing some text written in Inuktut using the Pigiarniq font. You may be using a specific conference or journal template. Here are the main things you need to pay attention to in preparing to use the font:
\usepackage{fontspec}: Use the fontspec package.\newfontfamily{\pigiarniq}{Pigiarniq}[Extension = .ttf, UprightFont = Pigiarniq Regular]: Define a new font family.\pigiarniqis the command you will use when you want to use this font.Pigiarniqis the font name.Extension = .ttfindicates that the font’s file extension is.ttf. For now we’ve just usedUprightFont = Pigiarniq Regular, which will be the default.\setmainfont{Times New Roman}: Because we were writing our document primarily in English, we chose to set the main font to Times New Roman and invoked the\pigiarniqcommand when writing in syllabics.{\pigiarniq ᖃᓂᐅᔮᖅᐸᐃᑦ}: When we write text in syllabics, we surround the text with curly brackets and invoke the\pigiarniqcommand inside the brackets, so it applies only to the text inside the brackets (here that text is ᖃᓂᐅᔮᖅᐸᐃᑦ, or qaniujaaqpait, but in the full example file you can see that you can put full sentences or even paragraphs inside the brackets). You can invoke it as\pigiarniq{ᖃᓂᐅᔮᖅᐸᐃᑦ}as well, if you prefer.- Compile with XeLaTeX (in Overleaf, select it from the dropdown under Menu > Settings > Compiler). This will not work if you try to compile with pdfLaTeX.
If you want to typeset all or most of your document in syllabics, you can instead use \setmainfont{Pigiarniq} and invoke commands for any other fonts you also wish to use.
In our example, we only set the UprightFont, but we could also set BoldFont = Pigiarniq Bold and ItalicFont = Pigiarniq Italic, comma-separated, like this:
\newfontfamily{\pigiarniq}{Pigiarniq}[Extension = .ttf, UprightFont = Pigiarniq Regular, BoldFont = Pigiarniq Bold, ItalicFont = Pigiarniq Italic]
This will allow you to invoke bold or italics as \textbf{\pigiarniq ᖃᓂᐅᔮᖅᐸᐃᑦ} or \textit{\pigiarniq ᖃᓂᐅᔮᖅᐸᐃᑦ}. For additional details and other options, see the fontspec package documentation.
One more neat thing about compiling with XeLaTeX is that it enables more UTF-8 characters supported directly in XeLaTeX’s Times New Roman font, like the barred T in SENĆOŦEN. This doesn’t require any additional font declarations (and it doesn’t require Pigiarniq); it just works when you compile with XeLaTeX!
Additional Options
UTF-8 Character Support in XeLaTeX
As mentioned above, XeLaTeX’s Time New Roman font includes a wider range of UTF-8 characters. If the characters you want to use (like the barred T in SENĆOŦEN) are included in that, you just need to type your text in the body, compile with XeLaTeX, and include just these in the header:
\usepackage{fontspec}
\setmainfont{Times New Roman}
Noto Fonts
There are some characters that exist in Noto fonts but not in XeLaTeX’s Times New Roman font, like the W̱ in W̱SÁNEĆ. You will still need to set the compiler to XeLaTeX. If you don’t have any constraints on fonts, the simplest way to use these is to just put the following in your header and type anything you want in the Noto fonts in the body:
\usepackage{noto}
If you would like to use Times New Roman as the main font, you can instead do the following in your header:
\usepackage{fontspec}
\usepackage{noto}
\setmainfont{Times New Roman}
Whenever you want to type something that is only included in a Noto font, you can do so as follows:
\notoserif{W̱}
You can also use \notosans{}; see the README for the noto package for more details and other options. Note that the size of the Noto fonts is slightly different than the Times New Roman font, so you might prefer to include whole words in the Noto font, like \notoserif{W̱SÁNEĆ}. See below for one solution for the W̱ character that doesn’t use Noto fonts.
Using TIPA with pdfLaTeX
This solution works with either pdfLaTeX or XeLaTeX for displaying characters like W̱ and Ŧ. In the header, use:
\usepackage{tipa}
And any time you want to use the character W̱, do:
\textsubbar{W}
The Ŧ is slightly more complicated to produce:
\ipabar{T}{0.75ex}{.6}{}{}
The 0.75ex determines how high up the bar is on the T, while the 0.6 is the bar width. If you use a different font, you may want to adjust these values for the best result.
The downside to this approach is that if you copy text that includes the W̱ or Ŧ from the resulting PDF, those letters will not copy correctly.
See Appendix C of the TIPA manual for more examples.
Some Words of Caution
If you are typesetting a document to submit to a publisher that has formatting requirements, you may want to check that it is ok to compile with XeLaTeX, because the output may differ visibly from the output as produced by pdfLaTeX. You can also see in the example that the syllabic text expands out too far and doesn’t have automatic hyphenation, so you may need to handle some spacing issues manually.
Review / Quick start
- Include the Pigiarniq font by downloading the Pigiarniq zip file (Pigiarniq1.2.zip) from the Tiro Typeworks website.
- Extract the
Pigiarniq Regular.ttffile. - Move the
Pigiarniq Regular.ttffile to the appropriate location:- Overleaf: Upload directly to your project.
- On your computer: Specify the path to the file or include in the folder as your main LaTeX file will be.
- Copy the code from the minimal working example into your project in a file named
main.tex. - Compile
main.texusing XeLaTeX.- This can be done in Overleaf by going to Menu > Settings > Compiler and selecting XeLaTeX from the dropdown.
- You should now have PDF output that looks like the screenshot in the output section!
References
In addition to the pages linked to throughout the blog post, we (Rebecca Knowles and Eric Joanis, the authors of the minimal working example above) found Cyril Goutte’s instructions on typing cuneiform useful in preparing this example, along with Overleaf’s instructions on using custom fonts, and the fontspec package documentation. If you want to dig deeply into LaTeX font encodings and their history, this LaTeX font encodings documentation may be of interest.